Hosting your web app with CloudFront and S3

Use a single point of access for your content
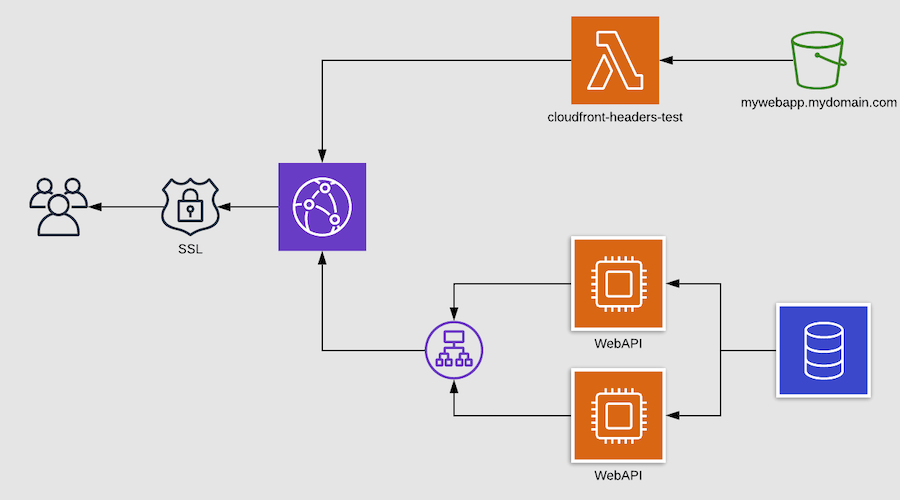
A common use-case for web-based applications today is to employ a single page web app in HTML5 and JavaScript and connect this front-end to a RESTful back-end API for accessing your data. The two parts of this setup have very different requirements for storage and scalability, so typically, a single system to host both is not the best solution.
In this blog post, we would like to give you an example of how you can make use of several Amazon Web Services technologies to efficiently deploy and connect the different parts.
CloudFront, S3 and EC2
AWS offers you a powerful set of tools and technologies that allow you to quickly deploy and deliver your content across the globe, with speed, scalability and security in mind.
The front-end part of your web app is going to be hosted on an S3 bucket, allowing you to easily deploy from a wide variety of developer tools and frameworks.
The back-end part of your web app can be delivered in many ways, but the REST API part will typically be hosted on a load-balanced cluster of web servers. Of course this could also be a Serverless setup, using EC2 Lambda and API Gateway, but for this blog post we're going to assume the API is exposed through an Elastic Load Balancing running in front of a set of EC2 instances.
The two parts will then be distributed globally over secure TLS through the AWS CloudFront content-delivery network.
Set up S3
Start off by creating a new S3 bucket. It's a good practice to name your bucket according to your web app's domain name. This allows you to easily find it later and it will already have a unique name.
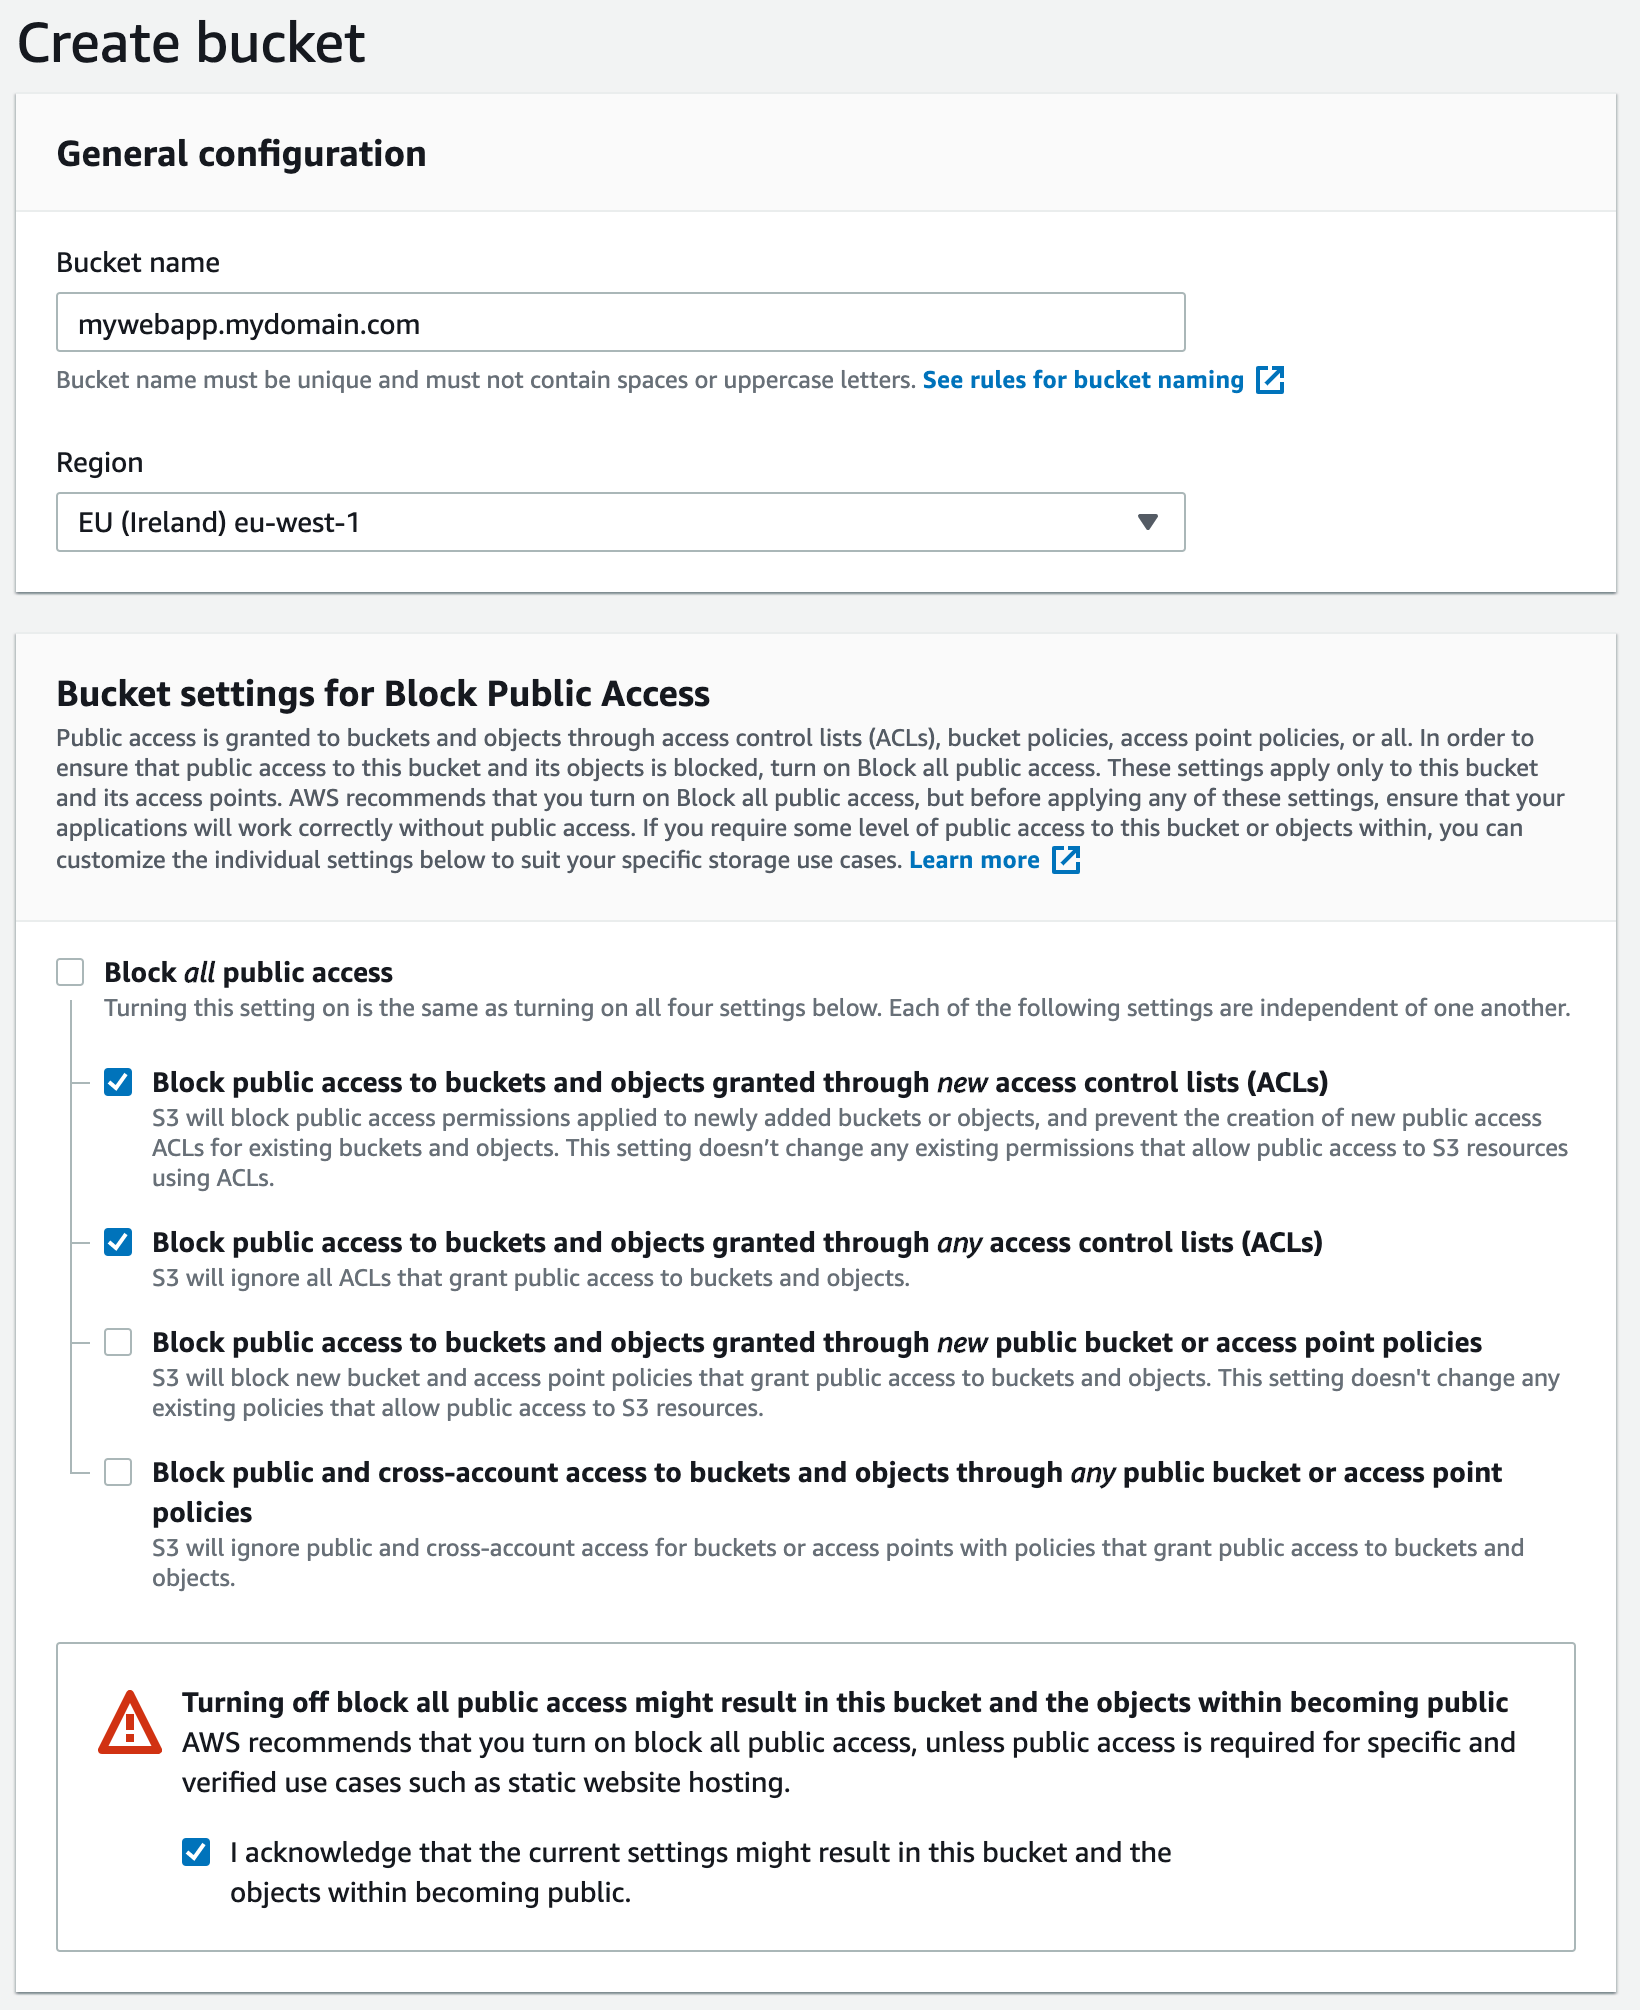
We are going to allow access to the bucket from CloudFront, so we need to set a bucket policy later. In this case, leave the 2 bottom options for public access unchecked, as shown in the screenshot.
It's important to configure the bucket as a static web server, the reason for this is the need for HTTP-compliant headers, index documents, trailing slashes and optional redirects, all of which will not be available with the (default) REST-based S3 access.
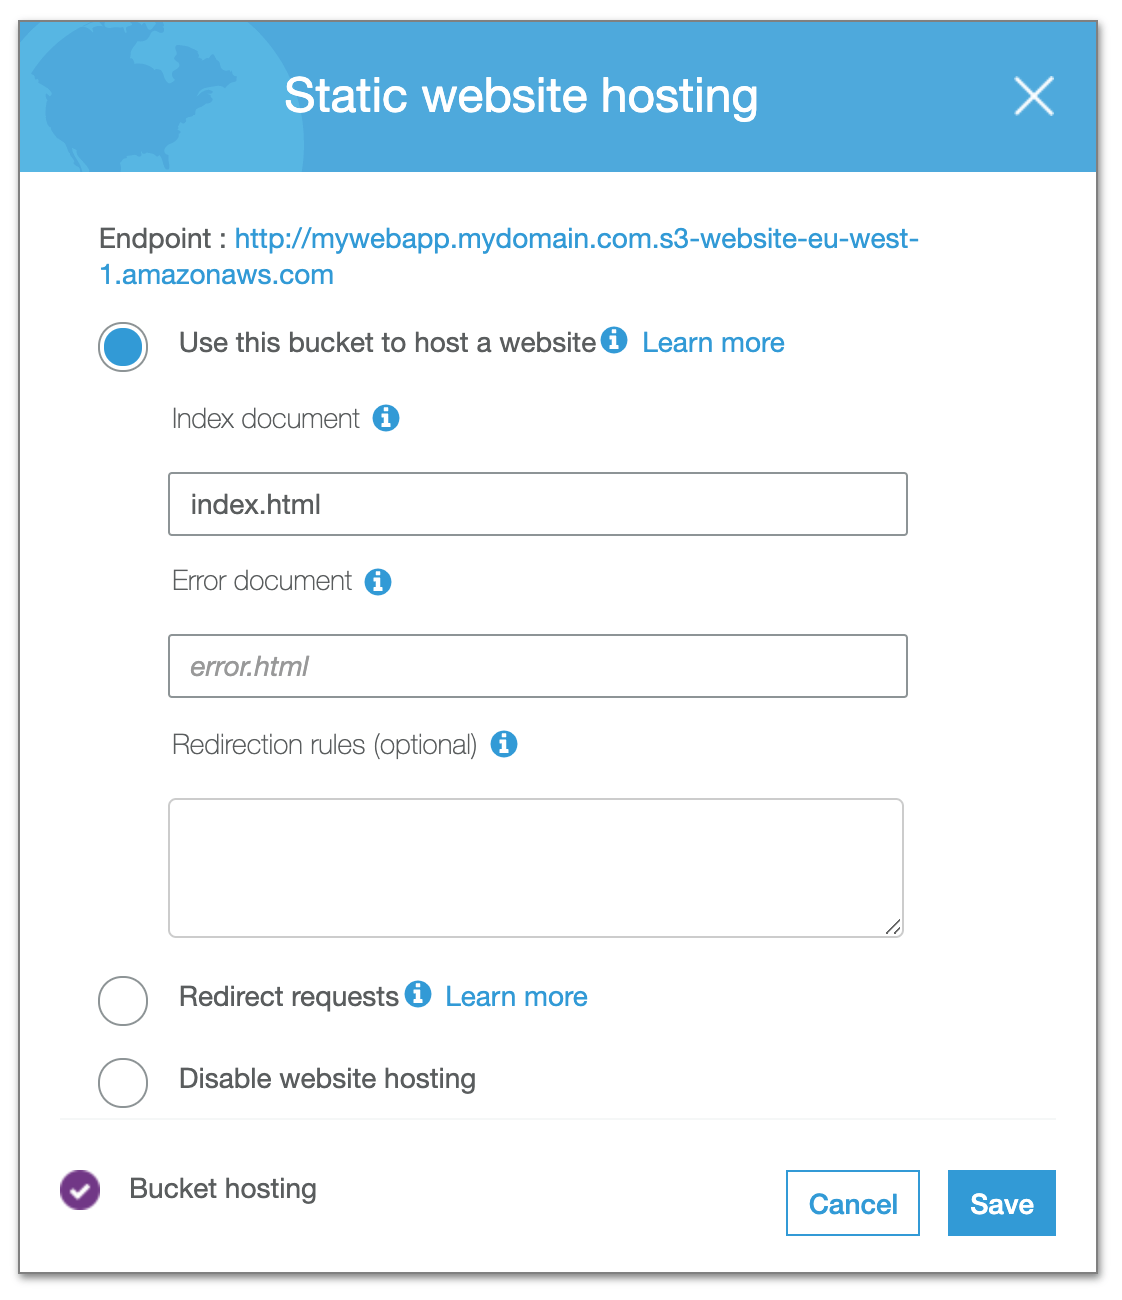
Copy the URL for the static website hosting endpoint, we will need it in the next step. (in this case it's http://mywebapp.mydomain.com.s3-website-eu-west-1.amazonaws.com)
We need to allow access to our files from the outside world. This is done by setting a Bucket Policy. Go to your S3 bucket Permissions and set a new Bucket Policy
 {
    "Version": "2012-10-17",
    "Statement": [
        {
            "Sid": "CloudFront",
            "Effect": "Allow",
            "Principal": "*",
            "Action": "s3:GetObject",
            "Resource": "arn:aws:s3:::mywebapp.mydomain.com/*"
        }
    ]
}
To be able to test your setup, upload a simple index.html file to your bucket before actually adding real content.
To (eventually) deploy your actual files, there are S3-compatible deploy plugins for most of the popular development frameworks.
For example, at Notificare, we use Ember.js for our dashboards, which can easily be deployed with a simple ember deploy command, which will upload a new version to S3 and even purge any cached assets from CloudFront automatically.
Set up CloudFront
Now, let's create a new CloudFront distribution to deliver this content securely.
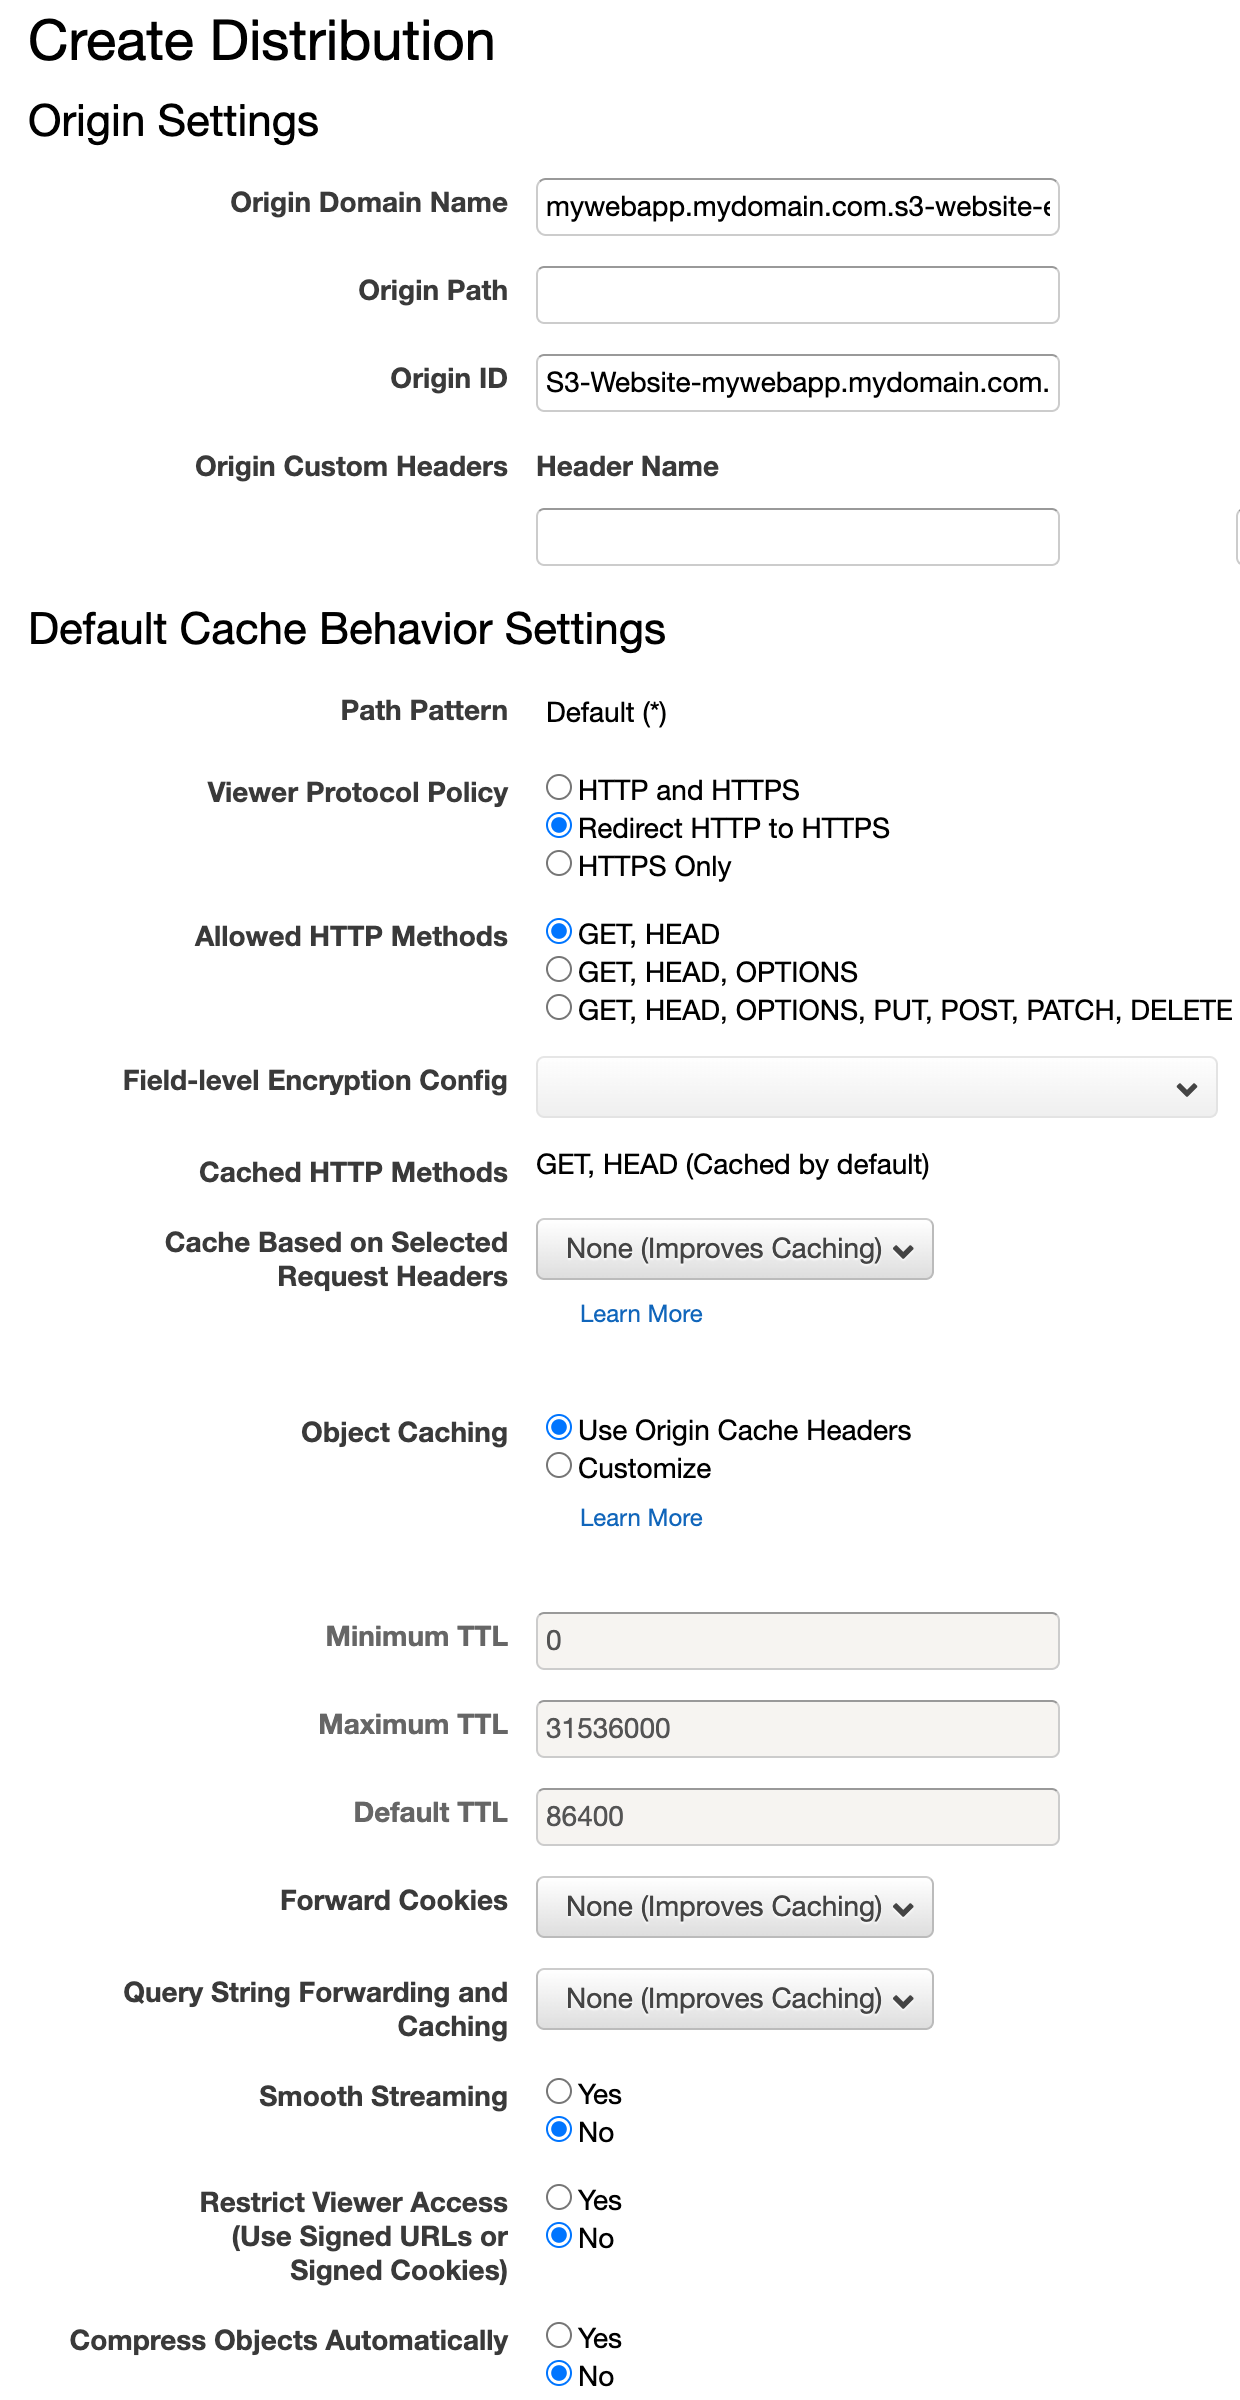
The Origin Domain Name field will already give you some suggestions, including the newly created S3 bucket. However, we will need to use the website hosting endpoint we copied in the previous step.
Since we are going to securely host our web app, we need to redirect all HTTP requests to HTTPS. For static content, we only need GET and HEAD methods and the most optimal caching strategy, which are all set by default like in the screenshot above.
Now, you will need to set your web app's domain name as a valid hostname for your CloudFront distribution.
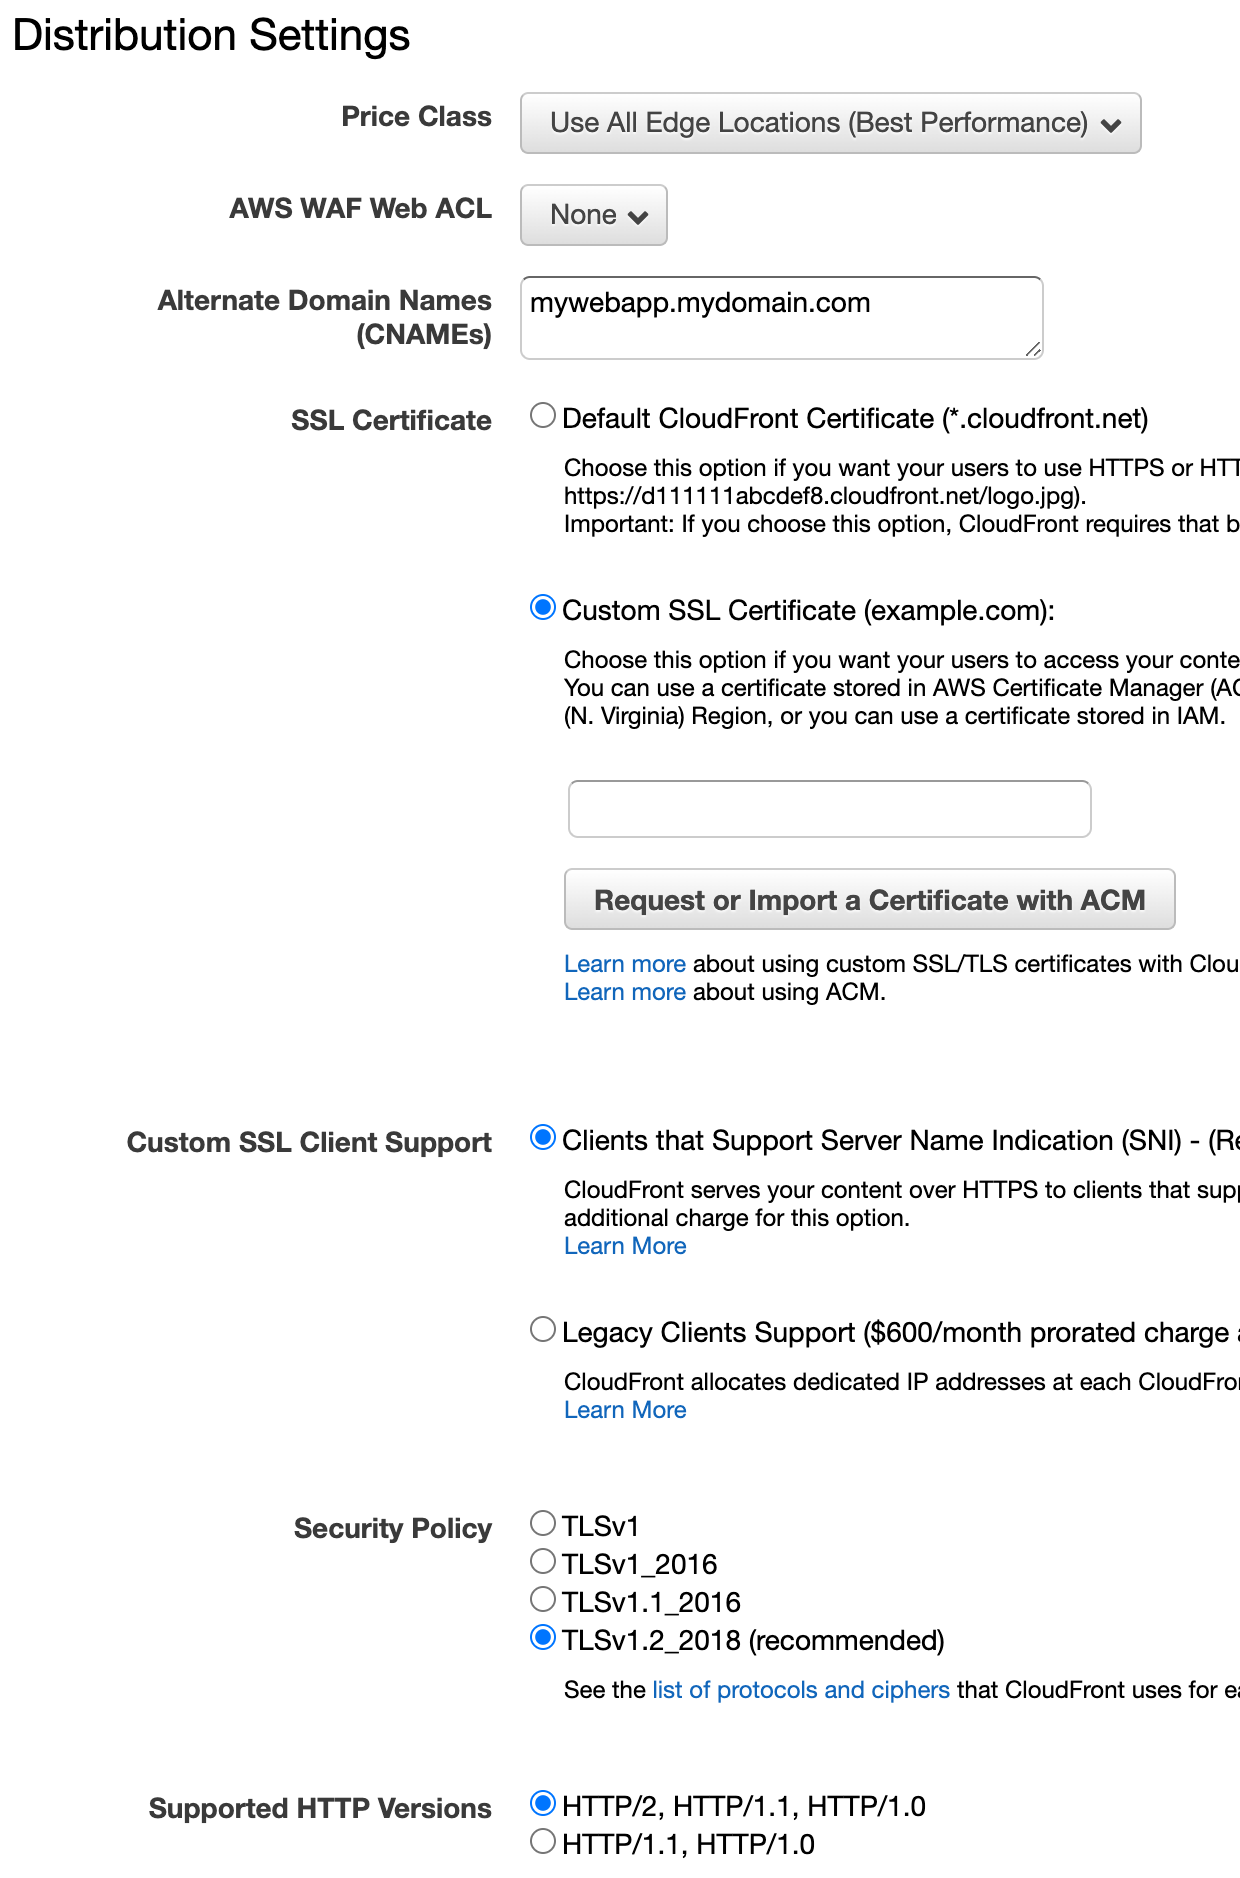
For secure access, we also need a valid SSL certificate that verifies our web app's hostname. AWS allows you to create these certificates for free, as long as they are used for AWS services.
Important: your certificates need to be created in the N. Virginia / us-east-1 region for CloudFront to be able to use them. This is done automatically, if you click the button to request a certificate.
In this case, enter your hostname for your web app as a CNAME and select to request a new certificate with ACM. If your domain's DNS is hosted with AWS Route 53, you can use DNS to validate, otherwise use an email to validate your identity.
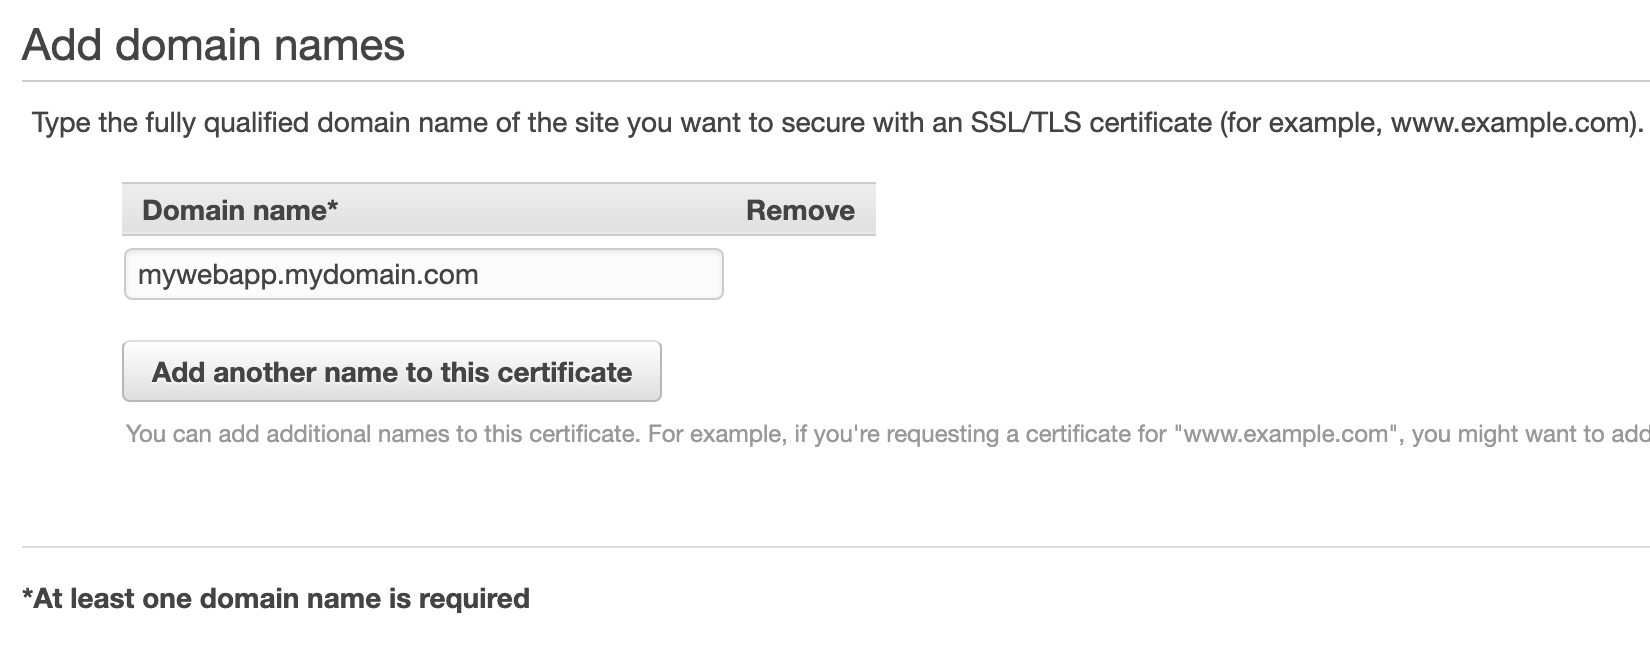
After the certificate is created and validated (and matches the CNAME), you will be able to select it from the drop down list of certificates.
Point your DNS to CloudFront
If your domain's DNS is hosted in AWS Route 53, you can point your DNS record as an alias to your newly created CloudFront distribution (it might take a while before it appears).

Any other DNS system will need to have a CNAME record pointing to the domain name of the CloudFront distribution, which you can find in the list of distributions. It is in the form of xxx.cloudfront.net.
If all is set up correctly, you will now be able to go to https://mywebapp.mydomain.com/ and see the content of your index.html file you uploaded in the S3 bucket.
Map your API
An easy way to connect your back-end API to your front-end web app without the need for CORS headers and configuration of different endpoints for development, test and production environments, is by running it alongside your front-end.
For this example, the API is going to be "mounted" on the path /api.
In most development frameworks, like Ember.js, you can also proxy your API requests through that path to either a locally hosted API or your production servers.
This way, your HTTP calls to your API will always be pointing at /api, regardless of the environment. It is important to understand that your API will see the full URL in all requests, so it will also need to handle the /api in its requests.
Assuming, again, that your API is running on a load-balanced cluster on AWS EC2, create a new Origin

And connect it to your ELB load-balancer, which should appear in the field drop-down.
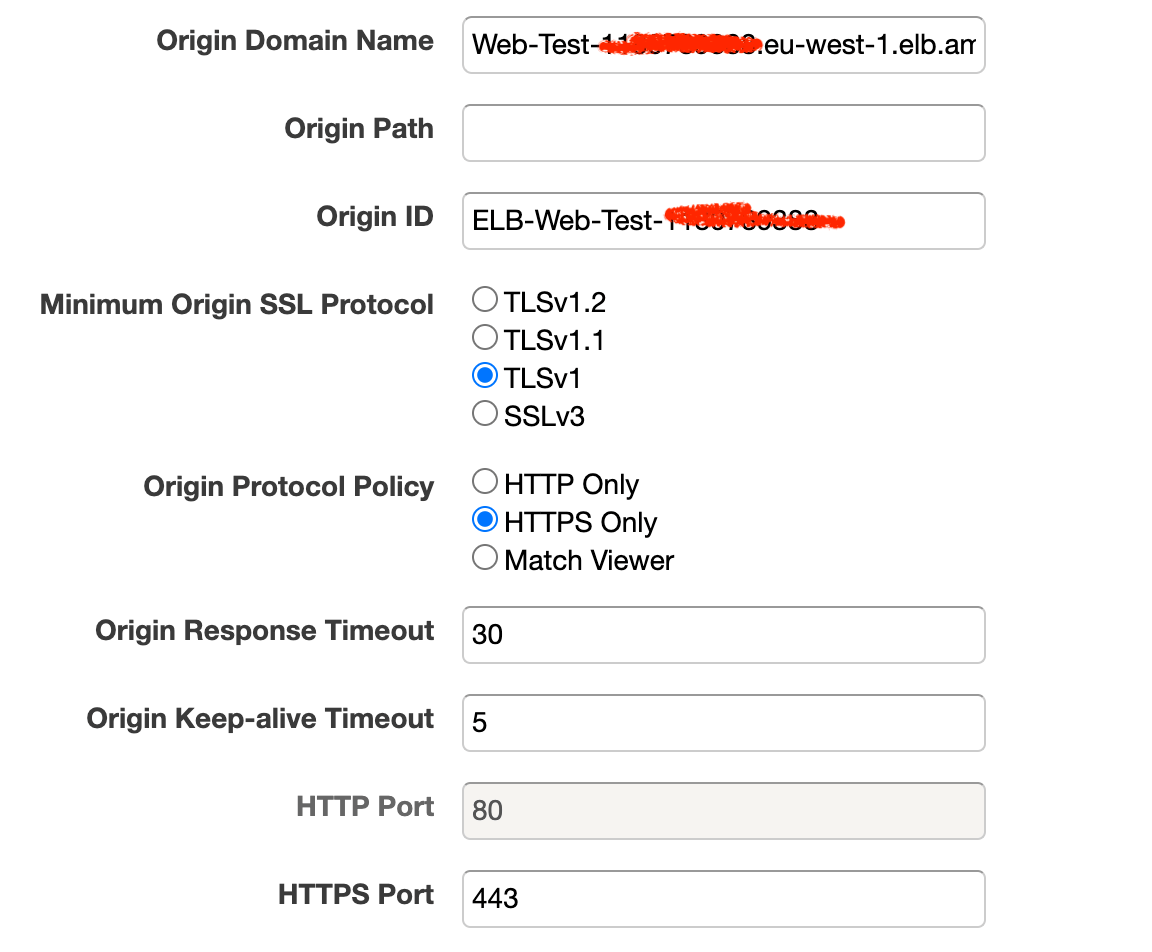
Now, you need to mount that new origin on the /api path. Go to Behaviors and create a new behavior:
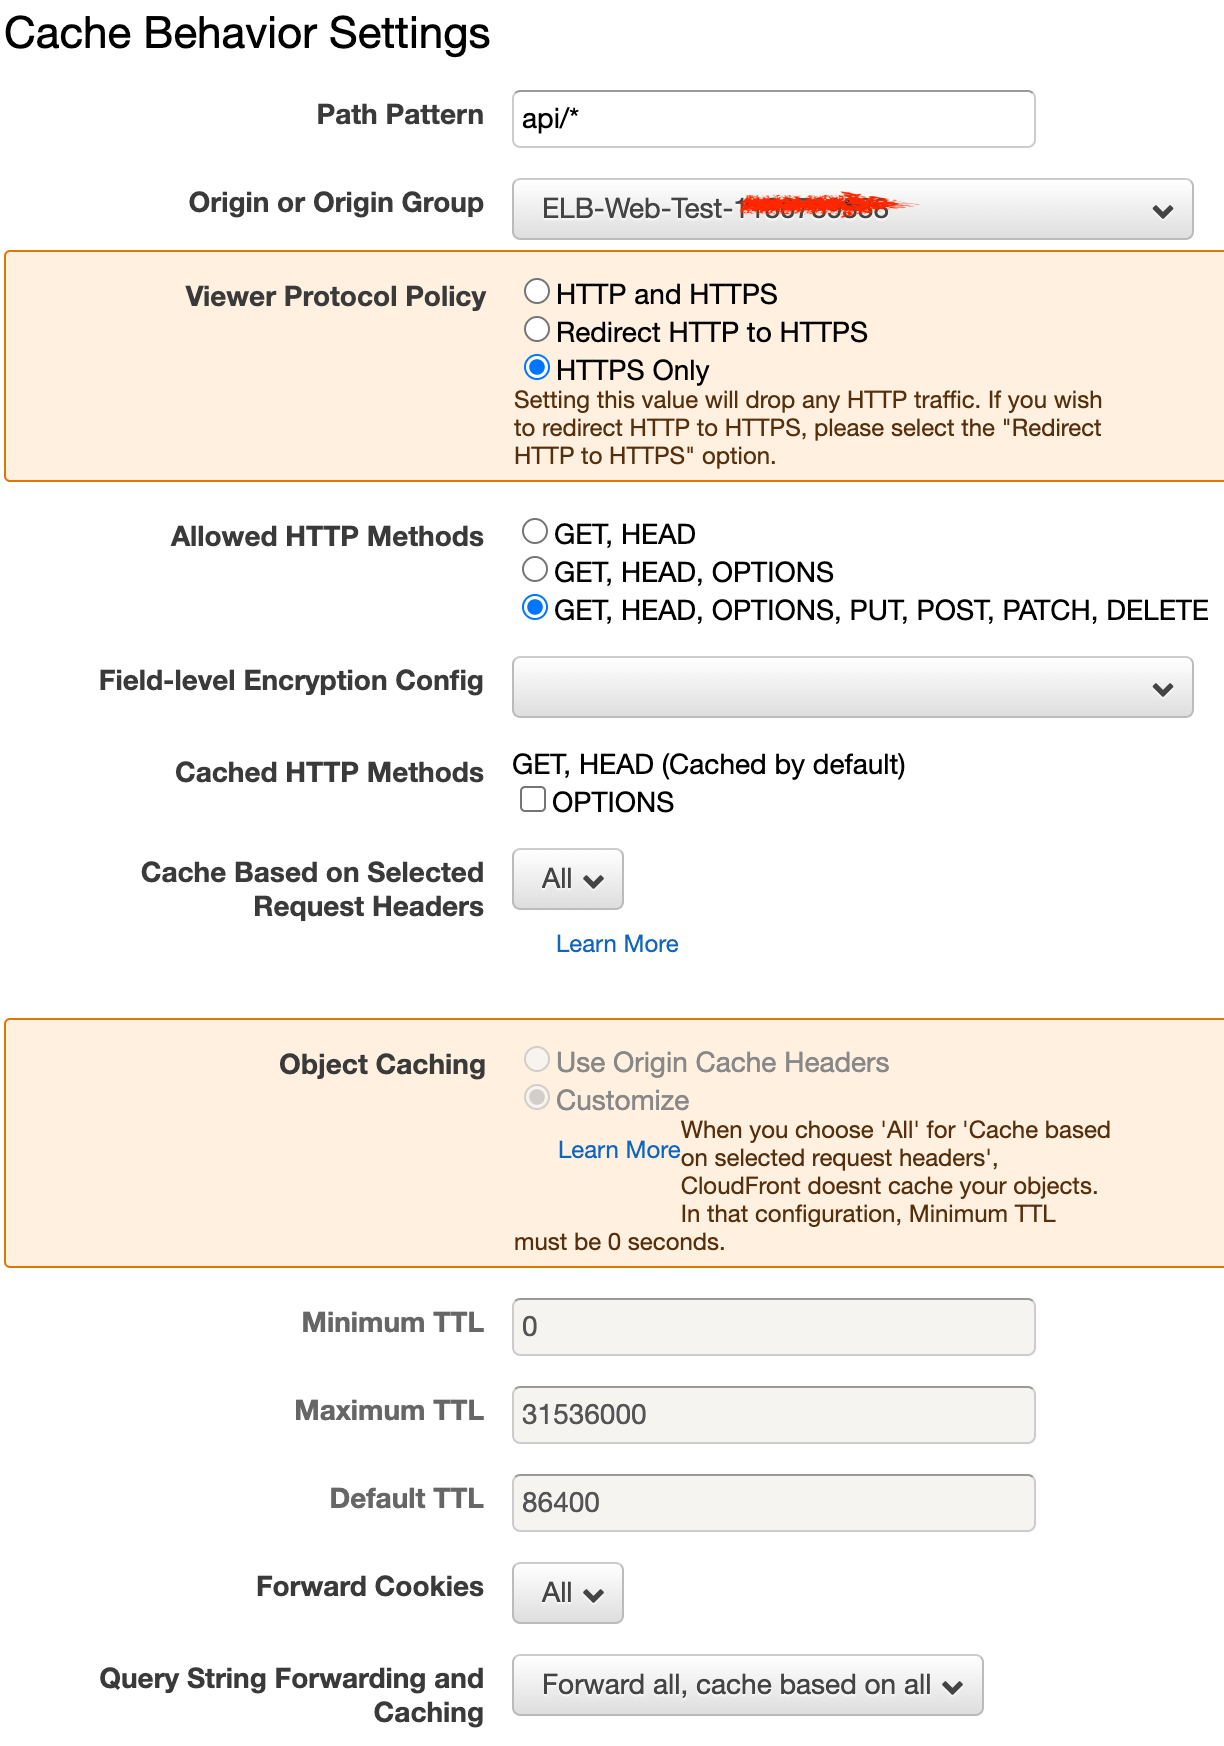
It's important to pass through all methods, headers, cookies and query parameters unchanged, unless you know it is not needed of course. The same goes for the other settings in this form, it all depends on the requirements and characteristics of your actual back-end API.
After the origin is mounted, it is important that it has a higher precedence in Behaviors than your static assets.

If all is set up correctly, you can now access https://testwebapp.mydomain.com/api/status or any other endpoint available in your back-end application.
Adding response headers
One shortcoming of S3, is that you can not include any HTTP header with your responses. Since you want to expose your web app in a secure way, some headers come in useful. CloudFront offers you a great way to rewrite requests and responses by way of Lambda functions.
For this example, let's add some security-related headers to each response coming from S3.
Start by creating a new Lambda function, with permissions to deploy as a CloudFront Lambda@Edge function. Again, these need to be created in the N. Virginia / us-east-1 region.
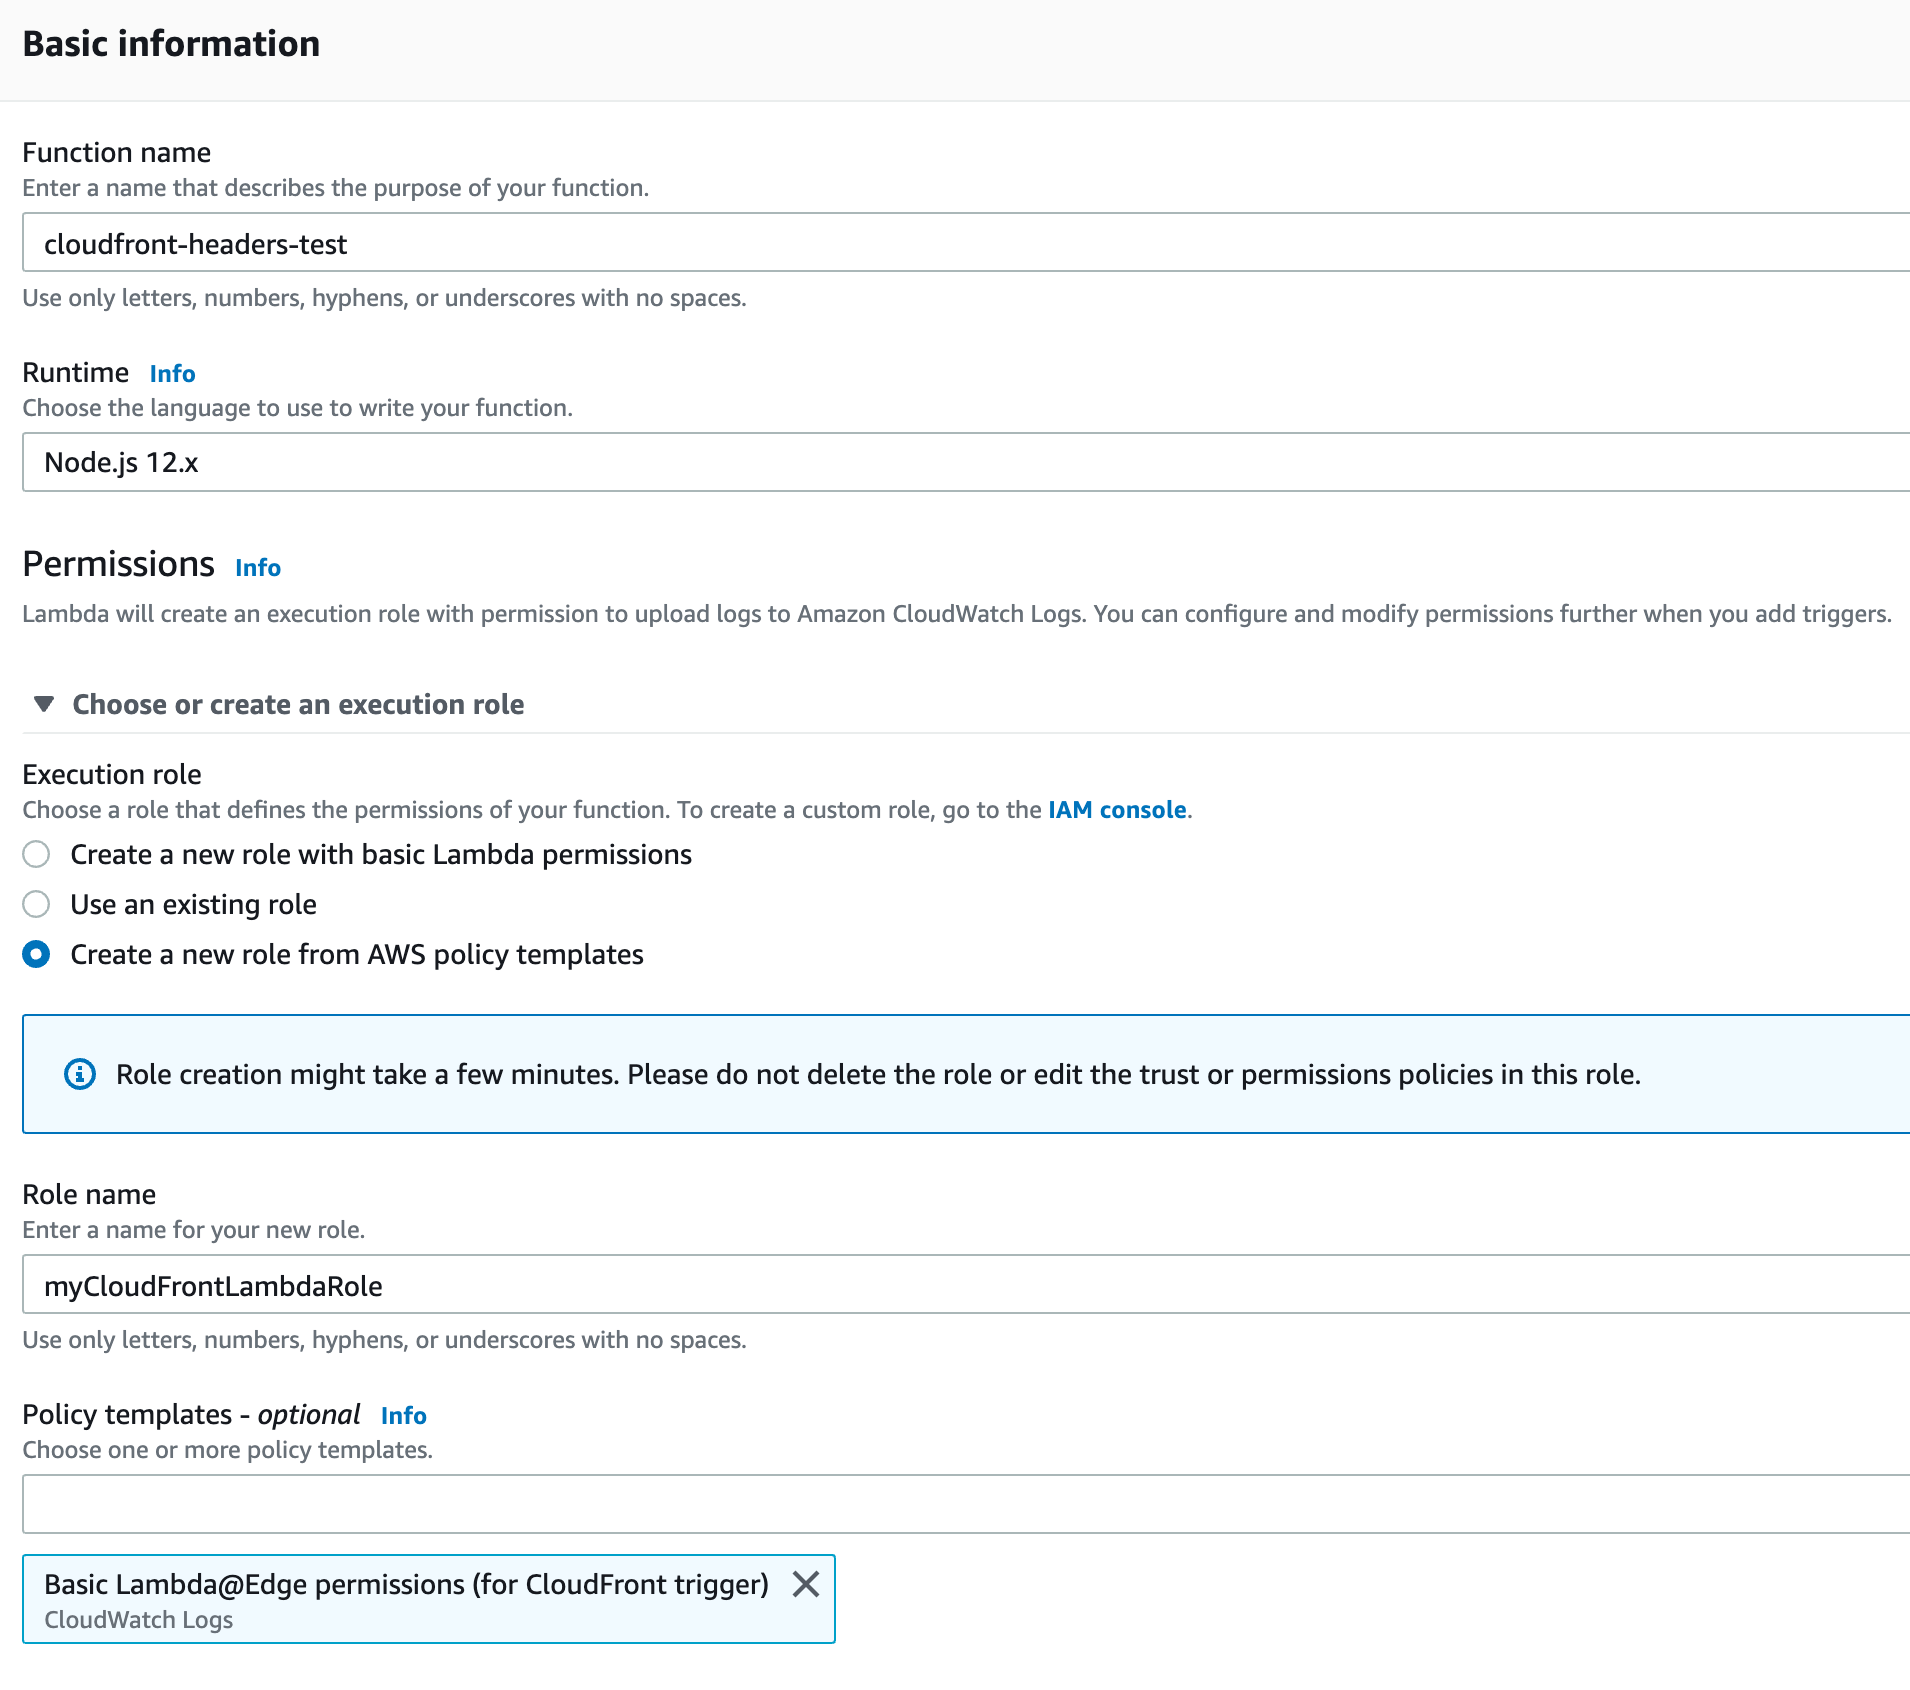
Now, in the code editor, paste the following code
'use strict';
exports.handler = (event, context, callback) => {

  //Get contents of response
  const response = event.Records[0].cf.response;
  const headers = response.headers;

  //Set new headers
  headers['x-ua-compatible'] = [{key: 'X-UA-Compatible', value: 'IE=edge,chrome=1'}];
  headers['strict-transport-security'] = [{key: 'Strict-Transport-Security', value: 'max-age=63072000'}];
  headers['x-content-type-options'] = [{key: 'X-Content-Type-Options', value: 'nosniff'}];
  headers['x-frame-options'] = [{key: 'X-Frame-Options', value: 'SAMEORIGIN'}];
  headers['x-xss-protection'] = [{key: 'X-XSS-Protection', value: '1; mode=block'}];

  //Return modified response
  callback(null, response);
};
Click Save to save the code, then pick Deploy to Lambda@Edge in the Actions menu. Choose your newly created CloudFront Distribution and select Origin Response.
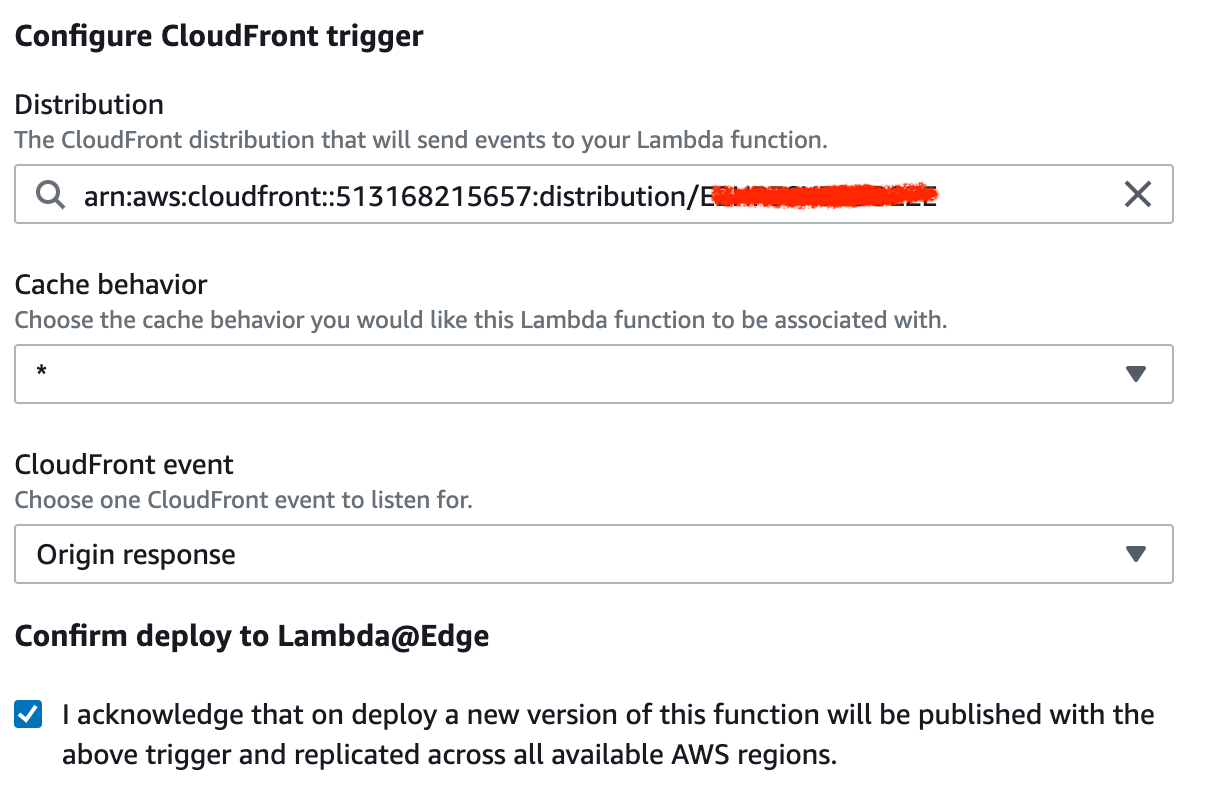
Reload your browser (make sure it is a full fetch, not a cached response) and you will see it has the security-related headers inserted in the HTTP response.
Conclusion
In the couple of steps outlined above, you will have a setup that scales with your requests and delivers outstanding response times when delivery your static assets together with your RESTful back-end to any place in the world. If you have any questions, corrections or simply just want to drop us a line, we are, as always, available via our Support Channel.
