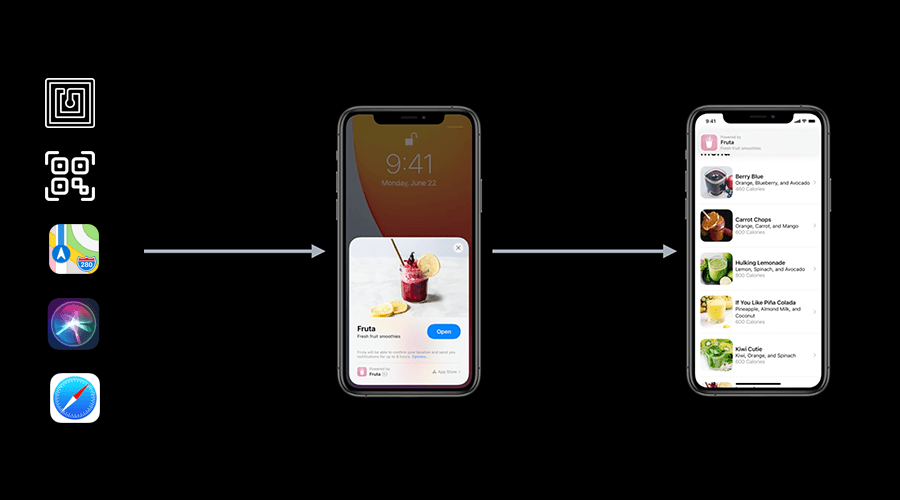
With iOS 14, Apple is bringing a whole new experience that lets your app provide a very convenient entry point for specific experiences in your app. You should see App Clips as a mini-app for certain features of your app.
For example, a restaurant app can create one App Clip to allow users to order food and another App Clip to reserve a table. Pretty much the same way, an app that provides a directory for several businesses can create an App Clip for each company profile. App Clips are also capable of using the user's location and receive remote notifications up to 8 hours after being installed.
How does it work?
App Clips can be prompted in several ways, allowing you to configure offline and online experiences as an entry point for your app. They will basically use an Universal Link which is something you can create with our Links feature.
NFC
By encoding these Links into an NFC tag, your store can quickly provide an entry point to your app by just creating a sign with a Tap to Open. When users tap on it with a NFC enabled device, it will conveniently show the App Clip.
QR Codes
Pretty much the same way, these Links can be embed in a QR Code and scanned to prompt the App Clip experience.
Maps
For registered business, App Clips can also be prompted from Maps place cards in iOS devices.
Siri Nearby Suggestions
They will also be automatically available in Siri Nearby suggestions.
Safari
You will also be able to open App Clips by adding smart app banners in your web pages. This will be pretty straightforward for those websites that already use these smart app banners to promote apps in the App Store.
Messages
When these smart banners are enabled in your web pages, sharing those links in iMessage will automatically create a new App Clip bubble that users can ultimately click to open your App Clip experience.
Apple will also release the new App Clip Codes. With a very distinct design, it will probably become the best way to discover new App Clips.

Later this year, Apple will be releasing new tools to encode Links and generate these App Clip Codes.
Handling Links in App Clips
Adopting our Links or Universal Links, for that matter, in your apps is pretty easy. If you are already supporting these in your app, adding support for your App Clips is very familiar. You start by adding the domain you get from us when you register a prefix (e.g.: myprefix.ntc.re) in the Associated Domains. This is done in your App Clip target by adding the Associated Domains capability:

Then depending on how your App Clip is built, you need to implement a method that handles the userActivity just like you do in your app code. For example, if you're already using SwiftUI in your App Clip:
import SwiftUI

@main
struct AppClip: App {
    var body: some Scene {
        WindowGroup {
           ContentView()
              .onContinueUserActivity(NSUserActivityTypeBrowsingWeb) { userActivity in
                  guard let incomingURL = userActivity.webpageURL,
                        let components = NSURLComponents(url: incomingURL,
                            resolvingAgainstBaseURL: true)
                  else {
                      return
                  }

                  // Go to the linked content in your App Clip
              }
        }
    }
}
If instead, you use an UIKit scene-base App Clip, you would implement this instead:
class SceneDelegate: UIResponder, UIWindowSceneDelegate {

    func scene(_ scene: UIScene, continue userActivity: NSUserActivity)
    {
        // Get URL components from the incoming user activity
        guard userActivity.activityType == NSUserActivityTypeBrowsingWeb,
            let incomingURL = userActivity.webpageURL,
            let components = NSURLComponents(url: incomingURL,
                resolvingAgainstBaseURL: true)
        else {
            return
        }

        // Go to the linked content in your App Clip
    }

}
This would be all you need to do to link content to your App Clips and add an additional entry point for your app.
Interested?
App Clips will be a major trend in 2021 and we expect a massive adoption by brands looking for new ways to interact with customers by combining convenience with beautiful moments of delight.
Grab your branded Link today by creating a prefix for free in Notificare's Links section of your app. Once you have your own prefix, you are ready to start creating Dynamic Links and implementing it in your app as described in this post.
As always, we remain available for any question you might have via our Support Channel.


