In a previous post, we've demonstrated how you can turn your web app into an installable application. This feature brings your web application a step closer to an app-like experience that usually you only experience in native apps.
In this post, we would like to take this a little bit further, by showing a few features that you can use to enhance your app once you make it an installable web app.
App Badging API
This API will allow your web app to show a badge over the app's icon. This badge will be displayed in different application-wide areas, such as the app switch or the dock/shelf, and handled automatically for you by the operating system.
![]()
Using a badge can be a useful way of notifying the user that there is something waiting for them without actually interrupting them. For example, chat and email app can use it to show the unread count of messages or a productivity app can signal the user when a certain background task is done.
The App Badging API works on Windows and macOS, in Chrome 81 and Edge 84 or later. This API is not available in Android, instead Android will automatically show a badge when there is unread notifications, just like native apps.
How to use it?
A badge will only be shown if the web app is installed. You can then use two methods of the navigator object. If you would like to set the badge you will use:
const unreadCount = 2;
navigator.setAppBadge(unreadCount);
And when you want to clear it, you can use the following:
navigator.clearAppBadge();Setting the badge to 0 is the same as using the clearAppBadge method. Both methods return a promise which you can use it to handle errors.
It is also important to notice some operating systems may not support a numeric representation of the badge. The browser will use whatever is available.
Shortcuts
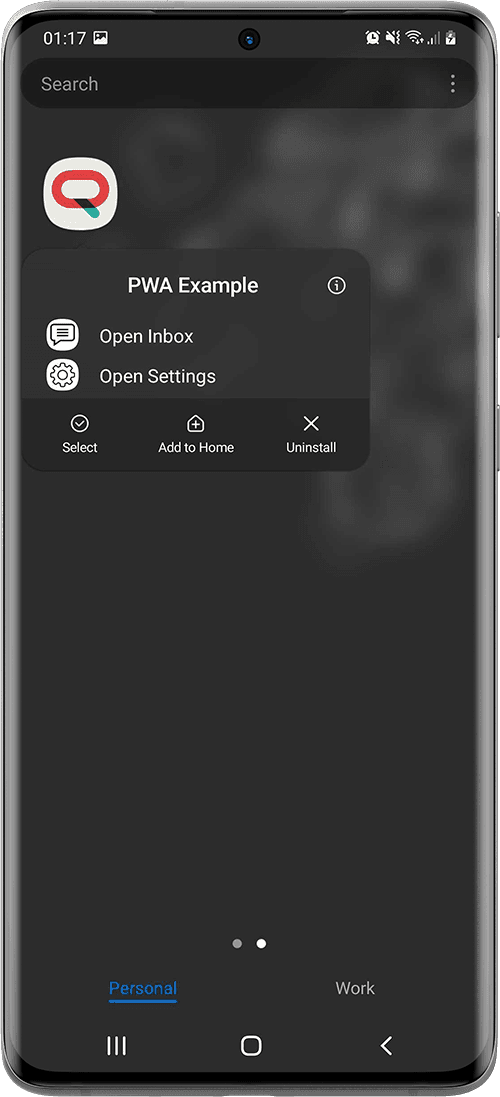
App shortcuts allow users quick access to certain areas of your web app. This feature is available on Android (Chrome 84 and later) and Windows (Chrome 85 and Edge 85).
The app shortcuts menu is invoked by right-clicking on the app icon in the taskbar (Windows) or dock (macOS) on the user's desktop, or long pressing the app's launcher icon on Android:

App shortcuts are optionally defined in the web app manifest. More specifically, they are declared in the shortcuts property as follows:
{
  "short_name": "PWA Example",
  "name": "PWA Example",
  ...
  "shortcuts": [
    {
      "name": "Open Inbox",
      "short_name": "Inbox",
      "description": "A list of notifications received by your app",
      "url": "/inbox",
      "icons": [{ "src": "/images/comment.png", "sizes": "192x192" }]
    },
    {
      "name": "Open Settings",
      "short_name": "Settings",
      "description": "Configure the settings of your app",
      "url": "/settings",
      "icons": [{ "src": "/images/settings.png", "sizes": "192x192" }]
    }
  ]
}
Each property of the shortcuts array is an object that contains at least a name and an url. Other properties are optional.
Web Share Target API
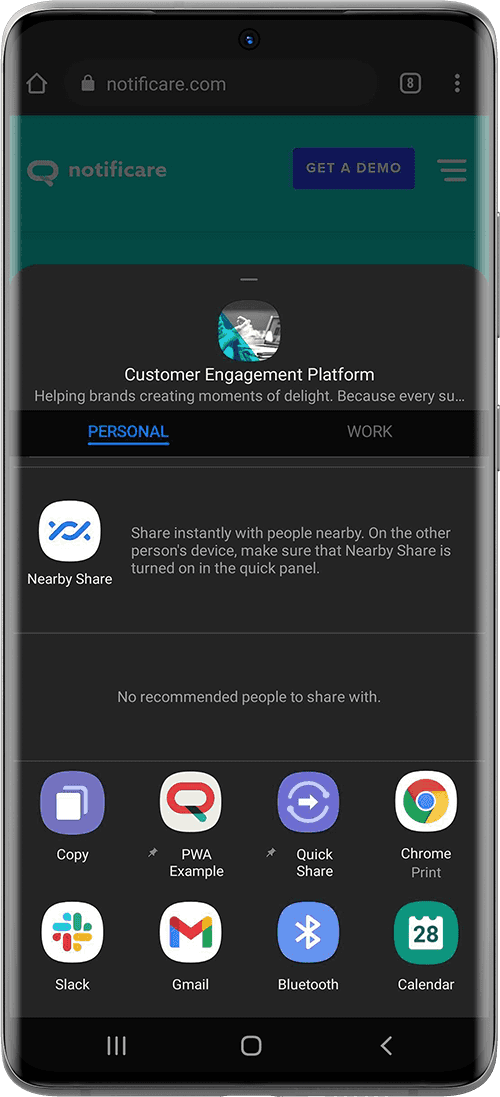
On mobile devices, sharing should be as straightforward as clicking a button. In the past, only native apps could register with the operating system to receive data from other apps. With this API, installed web apps can also register as the share target to receive content. This functionality is available on Chrome 76 or later for Android, or Chrome 89 or later on desktop.

To register your web app as a share target, add a share_target entry to its web app manifest. This will tell the operating system to include your app as an option in the intent chooser.
You can then use it in 3 different scenarios:
- Accept basic information
- Accept application changes
- Accept files
Basic information
If your app is only accepting basic information like links or text, you can include the following in your manifest:
"share_target": {
  "action": "/share",
  "method": "GET",
  "params": {
    "title": "title",
    "text": "text",
    "url": "url"
  }
}
You can then handle the incoming data in your web app as follows:
window.addEventListener('DOMContentLoaded', () => {
  const parsedUrl = new URL(window.location);
  console.log('Title: ' + parsedUrl.searchParams.get('title'));
  console.log('Text: ' + parsedUrl.searchParams.get('text'));
  console.log('URL: ' + parsedUrl.searchParams.get('url'));
});
Application changes
If the shared data changes the target app in some way, you should then use the POST method instead, as follows:
"share_target": {
  "action": "/share",
  "method": "POST",
  "enctype": "multipart/form-data",
  "params": {
    "url": "url"
  }
}
Because you are using POST, this data cannot be processed by your web app in foreground. Instead it must be handled by the service worker where you will intercept the data in the fetch event listener:
self.addEventListener('fetch', event => {
  const url = new URL(event.request.url);
  if (event.request.method === 'POST' && url.pathname === '/share') {
    event.respondWith((async () => {
      const formData = await event.request.formData();
      const link = formData.get('url') || '';
      const responseUrl = await saveLink(link);
      return Response.redirect(responseUrl, 303);
    })());
  }
});
In the example above you would be sending it to your own server using the pseudo function saveLink but you could also use client.postMessage() to pass it along to your foreground page, if any is available.
Files
Pretty much like in the previous example, accepting files will require you to use POST. Additionally you would need to add a new entry in your params object named files:
"share_target": {
  "action": "/share",
  "method": "POST",
  "enctype": "multipart/form-data",
  "params": {
    "title": "title",
    "text": "text",
    "url": "url",
    "files": [
      {
        "name": "images",
        "accept": ["image/*"]
      }
    ]
  }
}
You would then handle it in your service worker as follows:
self.addEventListener('fetch', event => {
  const url = new URL(event.request.url);
  if (event.request.method === 'POST' && url.pathname === '/share') {
    event.respondWith((async () => {
      const formData = await event.request.formData();
      const link = formData.get('url') || '';
      const images = formData.getAll('images');

      for (const image of images) {
        const client = await self.clients.get(event.resultingClientId || event.clientId);
	client.postMessage({ image: image, action: "handleImages" });
      }

      return Response.redirect(responseUrl);
    })());
  }
});
For all these sharing methods, it is important that you always verify the content of your incoming data. Unfortunately, there is no guarantee that other apps will share the appropriate content.
Conclusion
These are just some of the things you can use today to add functionality to your web app that will improve its overall user experience and take it a step closer to native-like functionality. As always, you can contact us via our Support Channel if you have any corrections, suggestions or you simply want to know more about progressive web apps.


