
Build an order status Live Activity

Getting familiar with the Live Activities intricacies

In a previous article, we wrote a detailed introduction to Live Activities. This time we're going a bit further, and build a more complex UI while learning the importance of monitoring the changes in Live Activities.
Define your data structure
A sensible first step is to define which bits of information are relevant to what we want to show the user. These bits of data can be about an order status, a live score, or anything suitable for your use case.
For the scope of this article, we're focusing on showing the user the status of an order.
When it comes to the concrete information structure for Live Activities, there are two kinds of data:
- Static attributes: data that will remain the same throughout the lifetime of the Live Activity.
- Content state: data that will suffer changes through the app or from a remote update, changing what the user sees.
Our example considers the purchased products as static attributes, while the state of the order is mutable and has a finite amount of possible values.
To illustrate this, here's a small code example:
import ActivityKit

struct Product: Codable, Identifiable {
    let id: String
    let name: String
    let description: String
    let price: Double
    let imageUrl: String
    let highlighted: Bool
}

public enum OrderState: String, Codable, CaseIterable {
    case preparing
    case shipped
    case delivered
}

public struct OrderActivityAttributes: ActivityAttributes {
    public struct ContentState: Codable, Hashable {
        var state: OrderState
    }

    let products: [Product]
}
Note that you must include these data structures not only in the app target but also in the widget target.
Building the UI
Iterating on the UI built in the introduction article, we're adding a few more elements and providing more at-a-glance information to the user.
If you are familiar with SwiftUI, you would expect a real-time preview of the Live Activity views. Unfortunately, Apple still needs to gift us with such a feature.
An alternative to work around this inconvenient development aspect, is a widget preview.
Although it's not a 100% accurate representation, the systemMedium family type is sufficient to give you an impression of how your view will look.
This workaround does not exclude performing proper tests!
@available(iOS 16.1, *)
struct OrderStatusLockScreenView_Previews: PreviewProvider {
    static var previews: some View {
        OrderStatusLockScreenView()
            .previewContext(WidgetPreviewContext(family: .systemMedium))
    }
}
Another implementation aspect of Live Activities is networking. Or rather, the lack of network access.
From the Product structure, you may get the impression you can use an AsyncImage to render the imageUrl.
Since the view is sandboxed, that approach is not going to work.
An alternative is downloading the image into shared storage, performing some modifications, and rendering the file instead. Let us know if you find this an interesting topic for another article! 🤓
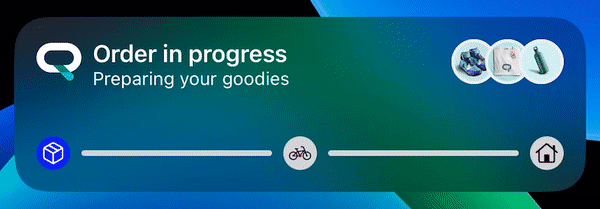
Without further ado, the Lock Screen UI includes a textual heading, a highlighted purchased products section and a stepped state tracker. As recommended by SwiftUI's best practices, the aforementioned views should be self-contained.
We opted to include a real-world example in our Notificare Go app instead of writing the extended code alongside this article. You can find the Live Activity widget here with all the accompanying views.
Register your Live Activity instances
In our introductory article, we mentioned you could have Live Activities updated with remote notifications. To facilitate this process, we introduced a new set of features in our SDK, enabling you to register categorized instances of Live Activities.
The simplicity of the Notificare Push API makes it a breeze to trigger those remote updates instead of integrating with APNS.
However, Apple has updated their documentation to favour Auth Keys over certificates. Live Activities require an Auth Keys to work.
Jumping straight to our SDK's features, there are two main methods:
registerLiveActivity: takes in the unique activity name, the push token and an optional collection of topics.endLiveActivity: takes in the activity name.
The method naming should be self-explanatory, but the summary is you use the first one when you have acquired a push token (or when it renews) for an activity and the second one when you want to stop an activity.
Furthermore, the topics act similarly to the tag mechanism. They exist to facilitate the distinction and segmentation of remote updates.
Monitoring changes
When you request a Live Activity, the push token may not be immediately available. You must often observe the push token updates to be sure you have acquired a valid push token, necessary for the registration.
With the new AsyncSequence making its way into the mainstream iOS API, we must bear in mind that these are awaitable sequences.
In other words, they will endlessly wait for new values. Therefore, the for loop will linger on, preventing code, that comes after, from running.
A simple way to avoid this is creating a new Task for each AsyncSequence we want to observe.
In our Notificare Go app, we have a few Live Activities requiring such monitoring.
We developed a small utility to ease the process of listening for the creation and deletion of Live Activities and observing state and push token changes. You can refer to this code for some inspiration.
Sending remote updates
Although you can integrate directly with APNS as described in our previous article, a much simpler approach is by leveraging the existing configuration and integration with Notificare.
The Notificare REST API exposes an endpoint for sending content updates to a specific activity identifier in combination with any topics you provide. Below is an example for such a request:
curl --location --request POST 'https://push.notifica.re/live-activity/message' \
--header 'Authorization: Basic ...' \
--header 'Content-Type: application/json' \
--data-raw '{
    "activity": "order-status",
    "content": {
        "state": "shipped"
    }
}'
The minimal payload requires the activity identifier and the content, but there are other properties.
activity: the activity identifier;topic: to filter activities containing the given topic;content: a JSON object representation of your Live ActivityContentState;title,subtitleandmessage: text to show in a notification, for instance, in the Apple Watch;final: a boolean indicating this update should end the activity;dismissalDate: an ISO date string or the milliseconds since the epoch.
Furthermore, you will need to send remote updates to a specific device while developing. You can use the Notificare Dashboard!
Find your device in the Audience section, and you'll be able to monitor the ongoing Live Activities and send remote updates through a graphical interface.

Wrapping up
We hope we conveyed the principles and provided the tools you need to build remarkable Live Activities!
Next on: replicating the Live Activities mechanism on Android. Stay tuned!
As always, we hope you liked this article and if you have anything to add, we are available via our Support Channel.